 Loading... Please wait...
- 800-733-6883
- My Account
We are working on upgrading and re-launching the site, and will be back online soon!
No Orders will be accepted online or offline during this time. Thanks for understanding!
Pages
- Home
- Party Articles
- Chocolate Easter Egg Making
Categories
- Holidays
- Party Supplies
- Shop By Themes
- Super Mario Brothers
- Mario Kart Wii
- The Octonauts
- Disney Frozen
- Paris Damask
- Star Wars
- Caillou
- Two-Two Train 2nd Birthday
- Avengers Assemble
- Ninja Warrior Party
- Barnyard
- Barnyard 2nd Birthday
- Owl Blossom
- Monster High
- Pink Mod Monkey
- Ballerina Tutu
- Carnival Games
- Candy Shoppe
- 1st Birthday Diva
- 70's Disco
- A New Little Prince
- A Nightmare on Elm Street
- Adventure Time
- Airplane Adventure
- Aladdin
- Alice in Wonderland
- Alligator
- Aloha Birthday
- Anchors Aweigh
- Anchors Aweigh 1st Birthday
- Angry Birds
- Animal Print Leopard
- Another Year of Fabulous
- Arizona Diamondbacks
- Atlanta Hawks
- Austin Powers
- Bachelorette Party
- Baking Bash
- Baltimore Orioles
- Bamboo Weave Luau
- Barbie All Doll'd Up
- Baseball
- Baseball Birthday
- Baseball Fan Birthday
- Baseball Time
- Basketball
- Basketball Birthday
- Basketball Fan
- Batgirl
- Batman
- Batman Dark Knight
- Batman Heroes and Villains
- Beauty and the Beast
- Beetlejuice
- Beyblade
- Big Top
- Birthday Jamboree
- Black and White Check
- Birthday Princess
- Black and White Check Birthday
- Black and White Dots
- Blue and White Dots
- Blue Elephants 1st Birthday
- Blue Polka Dot
- Bob the Builder
- Born to Rock
- Boston Red Sox
- Bowling
- Boy's Lil' Cupcake 1st Birthday
- Boy's Little 1
- Boys Only
- Bubble Guppies
- Camo Gear
- Camouflage
- Candy Land
- Captain America
- Celebrate
- Chevron Black
- Chevron Blue
- Chevron Green
- Chevron Pink
- Chevron Red
- Chevron Yellow
- Chic Wedding Cake
- Chloe's Closet
- Chuggington
- Cincinnati Reds
- Cinderella
- Circus & Carnival
- Cleveland Indians
- Colorado Rockies
- Colorful Commencement Graduation
- Congrats Grad White Graduation
- Construction Pals
- Construction Pals 1st Birthday
- Construction Pals 2nd Birthday
- Cops and Robbers Party
- Cow
- Cowboy
- Cowboy 2nd Birthday
- Curious George
- Cut the Rope
- Dallas Cowboys
- Dallas Mavericks
- DC Comics
- Despicable Me 2
- Detroit Pistons
- Dinosaur Roarrrrrr
- Dinosaur Train
- Dinosaurs
- Director's Cut Hollywood
- Disney 1st Birthday Cars
- Disney 1st Birthday Princess
- Disney Brave
- Disney Cars Dream Party
- Disney Cinderella Sparkle
- Disney Fanciful Princess
- Disney Junior Doc McStuffins
- Disney Junior Sofia the First
- Disney Mickey Fun and Friends
- Disney Mickey Playtime
- Disney Minnie Dream Party
- Disney Monsters U
- Disney Nemo's Coral Reef
- Disney Planes
- Disney Pooh and Pals
- Disney Princess
- Disney Princess Dreams
- Disney Princess Fairytale Friends
- Disney The Little Mermaid Sparkle
- Disney Very Important Princess Dream Party
- Disney's Cars 2
- Disney's Tangled
- Diva Zebra
- Diva Zebra 1st
- Donkey Kong
- Dora and Friends
- Dora's Flower Adventure
- Dr. Seuss ABC
- Easter Tulips
- Edward Scissorhands
- Elegant Prince Damask
- Elegant Princess Damask
- Elegant Princess Damask 1st Birthday
- Elegant Wedding
- Elf
- Elmo's 1st
- Elvis Presley
- Enchanted Unicorn
- Enchanted Unicorn 2nd Birthday
- Everything One Boy
- Everything One Girl
- Faithful Dove Pink Christening
- Falling Flakes
- Farm Animals
- Fashionista
- Fiesta Grande
- Fire Trucks
- Fisher Price Baby Shower
- Flip Flop
- Florida Marlins
- Flutterby Butterflies
- Football
- Football Frenzy
- Football Game Time
- Franklin and Friends
- Friday the 13th
- Frightfully Fancy Halloween
- Froggie Fun
- Froggie Fun 2nd Birthday
- Fun in the Sun
- Garden Fairy
- Georgia Bulldogs
- Get Wicked Cocktail
- Giddy Up Cowboy
- Giraffe
- Giraffe 1st Birthday
- Girl's Lil' Cupcake 1st Birthday
- Girl's Lil' Cupcake 2nd Birthday
- Girl's Little 1
- Girl's Night Out Bachelorette Party
- Girls Only
- Glee
- Goldfish
- Goth Feast
- Grad Celebration Graduation
- Grad Spirit Graduation 2012
- Grad Stars Graduation
- Green and White Dots
- Grill Master BBQ
- Halloween Party
- Halo 3
- Harry Potter
- Hawaiian Girl
- Hello Kitty Balloon Dreams
- Hibiscus
- Hippie Chick
- Hippity Hop
- Hippo Blue
- Hippo Pink
- Hollywood
- Holy Bleep
- Hooray for Elmo
- Horse Power
- Horses
- Houston Astros
- How to Train Your Dragon 2
- Hugs & Stitches
- I Love Lucy
- I Love Puppies 1st Birthday
- Ice Cream Sprinkles
- In The Garden
- Indiana Jones
- Indianapolis Colts
- Itzza Pizza Party
- Jacksonville Jaguars
- Jake and the Neverland Pirates
- Johnny Test
- Johnny Tractor 1st
- Joyful Snowman
- Just Dance
- Just Ducky 1st Birthday
- Kansas City Royals
- Knight
- LadyBug Fancy
- LadyBugs
- LadyBugs: Oh So Sweet
- LadyBugs: Oh So Sweet 2nd Birthday
- Lalaloopsy
- Let Them Eat Cake
- Let's Go Camping
- Lil' Prince 1st
- Lil' Princess 1st Birthday
- Lil' Quarterback 1st Birthday
- Lil' Slugger 1st Birthday
- Little Buccaneer
- Little Dino
- Little Dino 1st Birthday
- Little Man Mustache
- Little Man Mustache 1st Birthday
- Little Mermaid
- Little Spa Party
- Little Sunshine Party
- Littlest Pet Shop
- Look Whoo's 1 Blue
- Look Whoo's 1 Pink
- Los Angeles Angels
- Los Angeles Dodgers
- Luau
- LumberJack
- Madagascar 3
- Madeline
- Martial Arts
- Marvel Super Hero Squad
- Mermaids
- Mermaids Under the Sea
- Michael Jackson
- Michigan State Spartans
- Mickey Mouse Clubhouse
- Mickey's 1st Birthday
- Milwaukee Bucks
- Minnesota Timberwolves
- Minnie Mouse
- Minnie's 1st Birthday
- Missouri Tigers
- Mod Monkey
- Monster Jam
- Monster Jam 3D
- Monster Mania
- Monster Truck
- Mustache Man
- My Little Pony
- My Little Pony Friendship Magic
- NASA
- Nascar Full Throttle
- Nebraska Cornhuskers
- New York Giants
- NFL Drive
- Ni Hao, Kai-Lan
- Nickelodeon Teenage Mutant Ninja Turtles
- Nightmare On Elm Street
- Nighty Night BaZooples
- Nintendo
- Oakland Athletics
- Ocean Preppy Girl
- Oktoberfest
- Olivia
- Orlando Magic
- PAC-MAN and the Ghostly Adventures
- Pajanimals
- Penguins of Madagascar
- Philadelphia Phillies
- Phineas and Ferb
- Phoenix Suns
- Pink and White Dots
- Pink Cowgirl
- Pink Elephants 1st Birthday
- Pink Mustache
- Pink Poodle in Paris
- Pink Poodle in Paris 1st Birthday
- Pink Skull
- Pink Zebra Boutique
- Pink!
- Pinkalicious
- Pinocchio
- Pirate Party
- Pirates
- Pirates of the Caribbean
- Pittsburgh Panthers
- Playful Puppy Blue
- Playful Puppy Blue 1st
- Playful Puppy Pink
- Pocoyo
- Pokemon
- Polka Dot Garden
- Ponies
- Pooh and Friends
- Pooh's 1st Balloon
- Power Rangers Samurai
- Predator
- Pretty Pirates Party
- Prima Ballerina
- Princess Amira
- Princess and the Frog
- Quatrefoil
- rachaelhale Glamour Cats
- rachaelhale Glamour Dogs
- Rainbow
- Rainbow Wishes
- Rapunzel
- Red and White Dots
- Robots 2nd Birthday
- Rock Star
- Rock Star 2nd Birthday
- Rubber Ducky Birthday
- Safari Adventure Party
- Safari Friends 1st
- Safari Party
- San Diego Padres
- Scooby Doo
- Scooby-Doo Mod Mystery
- Sea Life
- Seattle Mariners
- Secret Agent
- Sesame Street
- Sesame Street 1st
- Sesame Street Beginnings 1st Birthday
- Sesame Street Elmo Party
- Sesame Street Party
- Sesame Street Sunny Days
- Sharks
- Shrek
- Shrek Forever After
- Silver Wedding
- Skylanders
- Sleeping Beauty
- Smurfs
- Smurfs 2
- Snoopy
- Snow White
- Soccer Birthday
- Soccer Fan Birthday
- Sock Monkey Blue
- Sock Monkey Pink
- Sock Monkey Red
- Sonic the Hedgehog
- Space Mission
- Special Forces
- Spider Hero Dream Party
- Spider-Man Spider Sense
- Splashin' Pool Party
- Sponge Bob
- SpongeBob
- Sports
- St Patrick's Day
- St. Louis Cardinals
- St. Pat Argyle
- Star Trek
- Strawberry Shortcake
- Sucker Punch
- Summer Splash Luau
- Summer Time Fun
- Sunny Stripe Pink
- Super Stylish
- Super Stylish 16
- Super Why
- Supergirl
- Superhero Comics
- Superman
- Superman: Man of Steel
- Sweet Blessing Blue Baptism & Christening
- Sweet Pea 1st Birthday
- Sweet Safari Blue 1st Birthday
- Sweet Safari Pink 1st Birthday
- Sweet Treats
- Sweet Tweet Bird Blue
- Sweet Tweet Bird Pink
- Sweet-As-Can-Bee
- Sweet-As-Can-Bee 1st Birthday
- Tampa Bay Buccaneers
- Tampa Bay Rays
- Tea For You
- Teenage Mutant Ninja Turtles
- Texas Chainsaw Massacre
- Texas Longhorns
- Thanksgiving Blessing
- The Addams Family
- The Amazing Spider-Man
- THE DOG
- The Jungle Book
- The Legend of Zelda
- The Lion King
- The Lord of the Rings
- The Twilight Saga: Breaking Dawn
- The Twilight Saga: Eclipse
- Thomas the Tank Engine
- Thor: The Mighty Avenger
- Tickety Toc
- Tie Dye Fun
- Tim Burton's The Nightmare Before Christmas
- Tinker Bell
- Tiny Toes Blue Baby Shower
- Tiny Toes Pink Baby Shower
- Tony Hawk's New Boom Boom HuckJam
- Topsy Turvy Tea Party
- Toronto Blue Jays
- Totally 80's
- Totally Fabulous Baby Shower
- Toy Story
- Toy Story 3
- Transformers
- Transformers Revenge of the Fallen
- Tropical Breeze
- Tropical Vacation
- Truck Party
- Turbo
- Two Peas in a Pod Baby Shower
- Uglydoll
- Umbrellaphants Blue Baby Shower
- Umbrellaphants Pink Baby Shower
- Under Construction
- Under the Big Top
- USC Trojans
- Utah Jazz
- V for Vendetta
- Victorious
- Video Games
- Washington Huskies
- Washington Nationals
- Washington Redskins
- Washington Wizards
- Watercolor Leaves
- West Virginia Mountaineers
- Western Bandanarama
- Western Bandanarama Birthday
- Western Lasso Cowgirl
- Whale of Fun
- Whale of Fun 1st Birthday
- White Winter Christmas
- Wild Horses
- Wild Isle Luau
- Willy Wonka
- Winter Friends
- Wisconsin Badgers
- Wizard of Oz
- Wizard of Oz Party
- Wizards of Waverly Place
- Wonder Pets
- Wonder Woman
- Wonderful Wizard of Oz
- Woodland Gnome
- Wow Wow Wubbzy
- WWE
- WWE Party
- X-Men
- Yellow and White Dots
- Yo Gabba Gabba
- Yo Gabba Gabba! 1st Birthday
- Yo Gabba Gabba! 2nd Birthday
- Yo Gabba Gabba! Party
- Zebra
- Zebra Graduation
- Zoology
- Age
- Category
- Bags & Purses
- Balloon Accessories
- Balls
- Banners
- Bean Bags
- Belts
- Blowouts & Noisemakers
- Books, Notepads & Pens
- Boots
- Bubbles
- Cake & Cupcake Stands
- Cake Candles
- Cake Pans
- Cake Toppers
- Candy Party Favors
- Candy Supplies
- Capes
- Centerpieces
- Classic Pinatas
- Confetti
- Cookie Supplies
- Coolers
- Crepe Paper
- Cupcake Liners & Cupcake Wrappers
- Cupcake Picks & Cupcake Rings
- Cupcake Stands
- Cups
- Curling Ribbon
- Decorating Kits
- Decorations
- Dessert Plates
- Dinner Plates
- Empty Favor Boxes
- Face & Body Parts
- Facial Hair
- Fangs & Teeth
- Filled Favor Boxes
- Glasses
- Gloves & Armbands
- Hats
- Hats, Headbands & Masks
- Headbands & Tiaras
- Invitations
- Invitations & Thank Yous
- Jewelry
- Jewelry & Accessories
- Keychains
- Kits
- Latex Balloons
- Makeup
- Masks
- Mylar Balloons
- Name Tags
- Napkins
- Other
- Other Cake & Cupcake
- Other Decorations
- Other Favors & Toys
- Other Tableware
- Pantyhose & Garters
- Pantyhose & Tights
- Pinata Accessories
- Placemats
- Props
- Pull-String Pinatas
- Servingware & Trays
- Shoe Covers
- Shoes
- Signs & Standups
- Solid Color Bowls
- Solid Color Cups
- Solid Color Cutlery
- Solid Color Dessert Plates
- Solid Color Dinner Plates
- Solid Color Forks & Spoons
- Solid Color Napkins
- Solid Color Placemats
- Solid Color Servingware & Trays
- Solid Color Tablecovers
- Souvenir Cups & Bottles
- Sprinkles, Jimmies & Edible Toppings
- Stickers & Tattoos
- Swords & Shields
- T-Shirts & Clothing
- T-Shirts and Clothing
- Tablecovers
- Thank Yous
- Tiaras & Crowns
- Ties & Scarves
- Toys
- Treat Bags
- Tutus & Petticoats
- Undergarments
- Wall, Ceiling & Door Decorations
- Wands
- Weapons
- Wigs
- Wings
- Celebration
- 1st Birthday
- 21st Birthday
- 2nd Birthday
- 30th Birthday
- 40th Birthday
- 4th of July
- 50th Birthday
- 60th Birthday
- Baby Shower
- Bachelorette Party
- Baptism/Christening
- Bar Mitzvah/Bat Mitzvah
- Birthday
- Bridal Shower
- Christmas
- Cinco de Mayo
- Communion/Confirmation
- Dress Up
- Easter
- Everyday
- Football / Superbowl
- Graduation
- Halloween
- Mardi Gras
- Mother's / Father's Day
- New Year's
- Oktoberfest
- Prom
- Retirement
- St. Patrick's Day
- Sweet 16
- Thanksgiving
- Valentine's Day
- Wedding
- Welcome Home
- Gender
- Theme Genre
- Alice in Wonderland
- Angels & Devils
- Animals
- Animals & Insects
- Books
- Bunny Suits
- Cars & Trucks
- Classic
- Clown
- Comics
- Cowboys & Indians
- Disco
- Disney
- Egyptian
- Fairy
- Fairytale & Storybook
- Fiesta
- Flapper
- Flowers
- Food & Beverage
- Gangster
- Geisha
- Gothic
- Grecian & Roman
- Gypsy
- Halloween Movies
- Hippie
- Historical
- Holiday
- Horror
- Humorous
- Irish & Scottish
- Kings & Queens
- Luau
- Luau & Fiesta
- Magic
- Mardi Gras
- Military
- Monsters
- Music
- Ninja
- Occupations
- Other
- Patriotic
- Pimp
- Pirates
- Political
- Prehistoric
- Princess
- Religious
- Renaissance & Medieval
- Santa Suits & Elves
- Sexy
- Skeletons
- Space & Aliens
- Sports
- Steampunk
- Superheroes
- Supplies
- TV & Movies
- Vampires
- Video Games
- Viking
- Vikings
- Werewolf
- Witches
- Shop By Themes
- Cake decorations
- Category
- Cake & Cupcake Stands
- Cake Boards
- Cake Candles
- Cake Decorating Kits & Cupcake Decorating Kits
- Cake Pans
- Cake Toppers
- Cookie Cutters
- Cookie Supplies
- Cupcake Liners & Cupcake Wrappers
- Cupcake Picks & Cupcake Rings
- Cupcake Stands
- Edible Cake Images
- Fondant, Gumpaste & Fondant Tools
- Food Colors
- Food Flavors
- Ingredients
- Other Cake & Cupcake
- Packaging
- Royal Icing Flowers
- Servingware & Trays
- Sprinkles, Jimmies & Edible Toppings
- Sugar Cake Decorations (Dec-ons)
- Utensils & Smallwares
- Celebration
- Shop By Themes
- 1 Love Puppies 1st Birthday
- A New Little Prince
- Abby Cadabby
- Aloha Birthday
- Aloha Luau
- American Idol
- Angry Birds
- Avatar
- Bakugan
- Barbie All Doll'd Up
- Baseball
- Baseball Birthday
- Basketball
- Basketball Birthday
- Batman Dark Knight
- Ben 10 Alien Force
- Bowling
- Bratz
- Butterflies and Dragonflies
- Camo Gear
- Captain America
- Card Night
- Cats & Kittens
- Cinderella Dreamland
- Congrats Grad Blue Graduation
- Congrats Grad Green Graduation
- Congrats Grad Orange Graduation
- Congrats Grad Purple Graduation
- Congrats Grad Red Graduation
- Congrats Grad White Graduation
- Congrats Grad Yellow Graduation
- Construction Pals
- Crayola
- Curious George
- Dinosaurs
- Disney Junior Sofia the First
- Disney Mickey Fun and Friends
- Disney Minnie Dream Party
- Disney Princess Dreams
- Disney Princess Fairytale Friends
- Disney's Cars 2
- Disney's World of Cars
- Dora and Friends
- Dots and Stripes Birthday
- Easter Tulips
- Fairy Princess 1st Birthday
- Faithful Dove Blue
- Faithful Dove Pink
- Falling Flakes
- Fiesta Grande
- Football
- Football Birthday
- Froggie Fun
- Garden Fairy
- Garden Party
- Giddy Up Cowboy
- Gingham Check
- Girl's Lil' Cupcake 1st Birthday
- Girl's Lil' Cupcake 2nd Birthday
- Girl's Little 1
- Girls Only
- Go, Diego, Go!
- Golf
- Goth Feast
- Handy Manny
- Hannah Montana Rock the Stage
- Hanukkah Fun
- Harley Davidson
- Harry Potter Deathly Hallows
- Hello Kitty Balloon Dreams
- High School Musical
- Hooray for Elmo
- Hot Wheels Speed City
- How to Train Your Dragon 2
- I Do Bridal Shower
- I Do Wedding
- I Love Puppies 1st Birthday
- ICarly
- John Deere
- John Deere Pink 1st Birthday
- Joyful Snowman
- Just Dance
- Just Ducky 1st Birthday
- King of the Jungle Baby Shower
- Knight
- Kung Fu Panda 2
- LadyBugs
- Lil' Angel 1st Birthday
- Lil' Rebel 1st Birthday
- Lil' Slugger 1st Birthday
- Little Dino 1st Birthday
- Little Mermaid
- Littlest Pet Shop
- Marvel Super Hero Squad
- Mickey Mouse Clubhouse
- Mickey's 1st Birthday
- Midnight Dreary
- Minnie Mouse
- Mis Quince
- Nascar Full Throttle
- Ni Hao, Kai-Lan
- Nickelodeon Teenage Mutant Ninja Turtles
- Pink Ribbon
- Pirate Party
- Pirates of the Caribbean
- Pokemon
- Pooh and Friends
- Pooh's 1st Balloon
- Pooh's Happy Day
- Power Rangers Jungle Fury
- Princess and the Frog
- Queen of the Jungle
- Robots 2nd Birthday
- Rock Star 2nd Birthday
- Safari Party
- Scooby Doo
- Sea Life
- Sesame Street Beginnings 1st Birthday
- Sesame Street Sunny Days
- Smurfs
- Soccer Birthday
- Special Forces
- Spider-Man Spider Sense
- SpongeBob
- Sports
- Star Wars Clone Wars
- Strawberry Shortcake
- Stripe Style
- Superman
- Sweet Pea Baby Shower
- Sweet Safari Blue 1st Birthday
- Sweet Safari Pink 1st Birthday
- Tea For You
- Teenage Mutant Ninja Turtles
- Thanksgiving Blessing
- The Twilight Saga: Eclipse
- Thomas the Tank Engine
- Thor: The Mighty Avenger
- Tie Dye Fun
- Tinker Bell
- Tinker Bell and the Fairies
- Tom and Jerry
- Topsy Turvy Tea Party
- Toy Story 3
- Transformers Revenge of the Fallen
- Tropical Vacation
- Umbrellaphants Pink Baby Shower
- Under Construction
- Valentine Cupcake
- Western Bandanarama Birthday
- Whale of Fun 1st Birthday
- Willy Wonka
- Winter Friends
- Wizards of Waverly Place
- Wonder Pets
- Wonderful Wizard of Oz
- Wow Wow Wubbzy
- Yo Gabba Gabba
- Yo Gabba Gabba! 2nd Birthday
- Zebra
- Theme Genre
- Category
- Costumes
- Age
- Category
- Celebration
- Gender
- Shop By Themes
- A Nightmare on Elm Street
- Aladdin
- Alice in Wonderland
- Animal Planet
- Austin Powers
- Avatar
- Avengers Assemble
- Batgirl
- Batman
- Beauty and the Beast
- Beetlejuice
- Captain America
- Cinderella
- Crayola
- Dallas Cowboys
- DC Comics
- Despicable Me
- Despicable Me 2
- Disney Frozen
- Disney Junior Sofia the First
- Dora and Friends
- Edward Scissorhands
- Elf
- Elvis Presley
- Fairytale & Storybook
- Friday the 13th
- Ghostbusters
- Halo 3
- Harry Potter
- How to Train Your Dragon
- How to Train Your Dragon 2
- I Love Lucy
- Indiana Jones
- Jake and the Neverland Pirates
- Kings & Queens
- LadyBugs: Oh So Sweet
- Lalaloopsy
- Little Mermaid
- Little Red Riding Hood
- Looney Tunes
- M&M's
- Marilyn Monroe
- Mermaids Under the Sea
- Michael Jackson
- Mickey Mouse Clubhouse
- Minnie Mouse
- Monster High
- Monsters Inc.
- NASA
- Nickelodeon Teenage Mutant Ninja Turtles
- Nightmare On Elm Street
- Ninja Warrior Party
- Pac-Man
- Peter Pan
- Pirates of the Caribbean
- Power Rangers
- Predator
- Rainbow
- Rapunzel
- Reno 911
- Scooby Doo
- Sesame Street
- Shrek
- Skylanders
- Sleeping Beauty
- Smurfs
- Snow White
- Spiderman
- SpongeBob
- Star Trek
- Star Wars
- Sucker Punch
- Super Mario Brothers
- Supergirl
- Superman
- Teenage Mutant Ninja Turtles
- The Addams Family
- The Flintstones
- The Incredibles
- The Lord of the Rings
- The Munsters
- The Nightmare Before Christmas
- The Pirates of the Caribbean
- Tim Burton's The Nightmare Before Christmas
- Tinker Bell
- Tom and Jerry
- Toy Story
- Transformers
- Universal Studios Monsters
- V for Vendetta
- Wizard of Oz
- Wonder Woman
- Zorro
- Theme Genre
- Angels & Devils
- Animals
- Animals & Insects
- Bunny Suits
- Classic
- Clown
- Comics
- Couples
- Cowboys & Indians
- Disco
- Disney
- Egyptian
- Fairy
- Fairytale & Storybook
- Fiesta
- Flapper
- Food & Beverage
- Gangster
- Ghosts
- Gothic
- Grecian & Roman
- Gypsy
- Halloween Movies
- Hippie
- Historical
- Holiday
- Horror
- Humorous
- Irish & Scottish
- Kings & Queens
- Luau
- Magic
- Mardi Gras
- Mascots
- Military
- Monsters
- Music
- Ninja
- Occupations
- Other
- Patriotic
- Pimp
- Pirates
- Plus Size
- Prehistoric
- Princess
- Pumpkins
- Religious
- Renaissance & Medieval
- Santa Suits & Elves
- Sexy
- Skeletons
- Space & Aliens
- Sports
- Steampunk
- Superheroes
- Supplies
- TV & Movies
- Vampires
- Video Games
- Viking
- Werewolf
- Witches
Chocolate Easter Egg Making
Posted on Feb 1st 2016
Making Chocolate Easter Eggs with Jean François Houdré
Compliments of FabulousFoods.com
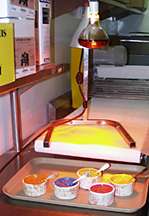 Step 1. Prepare materials and chocolate
Jean François insists that the most important step in making great chocolates is tempering. Unfortunately, it's also one of the trickest techniques to master. We have tempring instructions here at Fabulous Foods from pastry chef Jacques Torres, so if you're going to attempt to make Chocolate Easter Eggs at home, be sure to follow this link for tempering instructions first.
Professionals like Jean François have some nifty gadgets for helping them, like a digital candy thermometer that measures the heat of the chocolate, or the warming lamp that keeps it at the proper temperature once it's been tempered. At home, chef Houdré suggest that you turn on your oven to the lowest temperature possible, keep the door fully open, and keep your tempered chocolate on the warm open oven door. This should hold it at about the proper consistency.
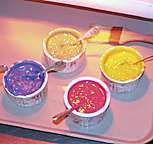 For the colors, Jean François uses either a good quality white chocolate or pure cocoa butter that has been colored with powdered food color. He says you could use pastes, but you have to be sure to avoid any coloring with alcohol because it will cause the chocolate to "seize" or crystallize.
Step 2. Prepare Base and Chocolate Bunnies for Filling
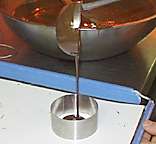
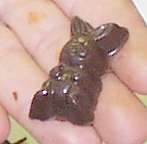
The next step is to prepare a base for the finished egg to stand on, and the tiny chocolate bunnies that will make up the surprise package to be stuffed into the egg later. Jean François uses an ordinary sheet of white acetate to pour the base, because the hardeed chocolate will easily slide off it. A metal pastry ring is used to mold the base, as in the first photo below (you'll see the finished chocolate disk, that is the base, later in this tutorial).
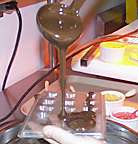
A plastic chocolate mold is used to make the bunnies. The chocolate is simply ladeled into the mold and the excess is then scraped back into the bowl. Now comes the most important technique in making the small molded candies: removing all the air bubbles. Gently tap the bottom of the mold and hold it up to the light and look underneath to insure that you have removed all the air.
The chocolate is then allowed to harden at room temperature until it is ready to be popped out of the mold. If you're in a hurry, you can chill the chocolate to hasten its setting, but letting it harden at room temperature is preferable and insures a better looking final product, says chef Houdré.
Step 3. Molding the Egg
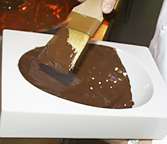
Now it's time to pour the mold for the large egg itself. After ladeling in some chocolate, a pastry brush is used to spread the chocolate evenly aroud the mold. The chocolate is allowed to set slightly, then the process is repeated (sometimes twice more) to create another layer of chocolate. You want the egg to be thick and strong enough to hold its shape and contents but not too heavy. Jean François explained that in Europe, eggs like these are sold by weight, so the more chocolate that is poured, the more expensive the final product.

Step 4. Cleaning the Mold
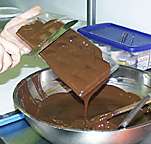
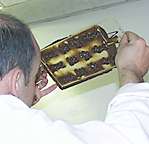
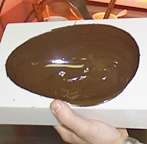
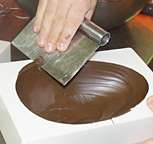
Now, the molds must be cleaned, so that the edges are completely level and even with the surface of the mold -- a crucial step so the egg will fit together properly. A pastry scraper does quick work of the job. The second photo below shows two freshly poured, cleaned molds. Notice the glossiness of the chocolate in all the photos, this is a result of high quality chocolate and proper tempering.
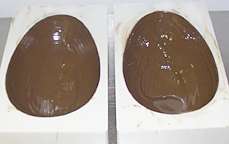
Step 5. Unmolding the Egg
After the poured molds have been allowed to harden, it's time for unmolding. If you're making these at home, you may have to wait for the egg to catch up to you. In Jean François' case, he usually makes about a hundred eggs, so by the time he has filled his last mold, the first has already set. Give the mold about 20 minutes to set.
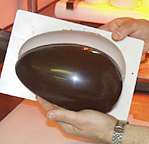
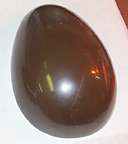
Unmolding takes a gentle touch and the chocolate should slide right out. Of course, you want to touch the chocolate as little as possible as the heat from your body will cause it to start melting.
Now that you have molded eggs and bunnies to stuff inside its time to paint the eggs
Step 6. Painting the Egg
Jean François uses a tiny pastry bag, fashioned from parchment paper, to make a tiny writing utensil. fter folding the cone, he fills it with tempered white chocolate or cocoa butter, then snips off just a tiny tip off the end, and begins writing. The egg mold and/or a metal pastry ring are used at various in times in the process to prop the egg at the necessary angles for work. Needless to say, our favorite pastry chef has a lot of natural artistic ability and decades of experiece. He adds the intricate embellishments to the writing, seemingly effortlessly.
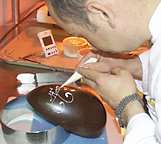
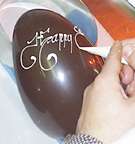
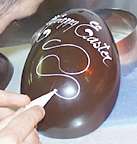
Step 7. Painting the Egg
Using pure cocoa butter, colored with powdered food colors, the true artist in Jean François comes out. This egg, like the ones that are sold at the Sutton Place Hotel, are decorated with a floral design. Jean François' artistic talents go far beyond this, however, as you'll see by checking out his Easter Chocolate Gallery.
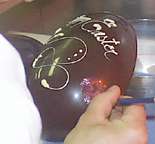

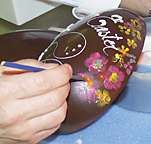
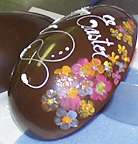
Step 8. Joining the Egg Halves
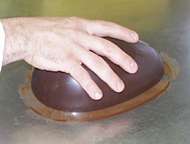
Now comes the crucial time to join the two egg halves together. You must work quickly in order to handle the chocolate as little as possible and to minimize unwanted melting.
What Jean François did next was quite interesting, although impractical for most home cooks (don't worry, we'll give you an alternative). Taking a blow torch to his stainless steel work table, he heated the surface just enough to melt the chocolate slightly on contact. Working quickly he rubbed the egg halves on the heated surface to completely level them, as well as slightly melting the chocolate into a glue that will harden and hold the two sides together. If anything is to be placed inside the egg, such as a small bag of the chocolate bunnies that were made in Step 2, now is the time to do it, or forever hold your peace!
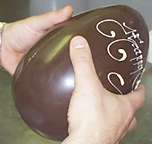
Step 9. Finishing the Egg
To finish the egg, Jean François propped up his creation in a metal pastry ring and proceeded to fill another tiny pastry bag, this time with dark chocolate. He then piped a line of tiny chocoalte beads neatly along the seam. This border didn't reach completely to the bottom, as the bottom of the egg will rest upon the base that was made back in Step 2.
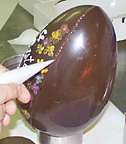
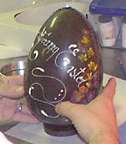
To attach the completed egg to the base, Jean François just uses a little more tempered chocolate, which acts as a glue, and carefully sets his masterpiece in place. A little packaging and this edible work of art is ready to go!
After the egg sets in the base, it time to display it for all the world to see. Take a look at Jean François' Easter Egg Gallery.
